Git Commit 之道:规范化 Commit Message 写作指南
1 commit message 规范
commit message格式都包括三部分:Header,Body和Footer
| |
Header是必需的,Body和Footer则可以省略
1.1 Header
Type(必需)
type用于说明
git commit的类别,允许使用下面几个标识。feat:新功能(Feature)“feat"用于表示引入新功能或特性的变动。这种变动通常是在代码库中新增的功能,而不仅仅是修复错误或进行代码重构。
fix/to:修复bug。这些bug可能由QA团队发现,或由开发人员在开发过程中识别。fix关键字用于那些直接解决问题的提交。当创建一个包含必要更改的提交,并且这些更改能够直接修复已识别的bug时,应使用fix。这表明提交的代码引入了解决方案,并且问题已被立即解决。to关键字则用于那些部分处理问题的提交。在一些复杂的修复过程中,可能需要多个步骤或多次提交来完全解决问题。在这种情况下,初始和中间的提交应使用to标记,表示它们为最终解决方案做出了贡献,但并未完全解决问题。最终解决问题的提交应使用fix标记,以表明问题已被彻底修复。
docs:文档(Documentation)“docs” 表示对文档的变动,这包括对代码库中的注释、README 文件或其他文档的修改。这个前缀的提交通常用于更新文档以反映代码的变更,或者提供更好的代码理解和使用说明。
style: 格式(Format)“style” 用于表示对代码格式的变动,这些变动不影响代码的运行。通常包括空格、缩进、换行等风格调整。
refactor:重构(即不是新增功能,也不是修改bug的代码变动)“refactor” 表示对代码的重构,即修改代码的结构和实现方式,但不影响其外部行为。重构的目的是改进代码的可读性、可维护性和性能,而不是引入新功能或修复错误。
perf: 优化相关,比如提升性能、体验“perf” 表示与性能优化相关的变动。这可能包括对算法、数据结构或代码实现的修改,以提高代码的执行效率和用户体验。
test:增加测试“test” 表示增加测试,包括单元测试、集成测试或其他类型的测试。
chore:构建过程或辅助工具的变动“chore” 表示对构建过程或辅助工具的变动。这可能包括更新构建脚本、配置文件或其他与构建和工具相关的内容。
revert:回滚到上一个版本“revert” 用于回滚到以前的版本,撤销之前的提交。
merge:代码合并“merge” 表示进行代码合并,通常是在分支开发完成后将代码合并回主线。
sync:同步主线或分支的Bug“sync” 表示同步主线或分支的 Bug,通常用于解决因为合并而引入的问题。
Scope(可选)
scope用于说明 commit 影响的范围,比如数据层、控制层、视图层等等,视项目不同而不同。例如修改了
Dao或者Controller,则可以添加表示这些范围受到影响,这有助于更清晰地理解提交的变更影响范围。例如:1feat(Controller): 添加用户登录功能这个提交消息中,
Controller是scope,表示这次提交影响了控制层。1fix(DataAccess): 修复数据查询逻辑这个提交消息中,
DataAccess是scope,表示这次提交影响了数据访问层。如果你的修改影响了不止一个scope,你可以使用
*代替。Subject(必需)
subject是 commit 目的的简短描述,不超过50个字符。规范如下:- 以动词开头,使用第一人称现在时,比如
change,而不是changed或changes - 第一个字母小写
- 结尾不加句号(
.)
例如:
1feat(UserAuth): implement user authentication这个提交消息中,
implement user authentication是subject,简洁明了地描述了引入用户认证功能的目的。1fix(Validation): correct input validation logic这个提交消息中,
correct input validation logic是subject,清晰地说明了修复输入验证逻辑的目的。- 以动词开头,使用第一人称现在时,比如
1.2 Body
Body 部分是对本次 commit 的详细描述,可以分成多行。Body编写有两个注意点。
- 使用第一人称现在时,比如使用
change而不是changed或changes。这有助于使描述更加直观和连贯,增强可读性。- 应该说明代码变动的动机,以及与以前行为的对比。
Body部分不仅仅是描述代码的变动,还应该解释为什么进行这个变动,以及与之前的代码行为相比有哪些改进。这有助于其他开发者更好地理解代码变更的背后动机和意图。
1.3 Footer
Footer 部分只用于两种情况。
不兼容变动
如果当前代码与上一个版本不兼容,则 Footer 部分以
BREAKING CHANGE开头,后面是对变动的描述、以及变动理由和迁移方法。关闭 Issue
如果当前 commit 针对某个issue,那么可以在 Footer 部分关闭这个 issue 。
1Closes #234也可以一次关闭多个 issue 。
1Closes #123, #245, #992
1.4 示例
添加用户配置文件编辑功能
1 2 3 4 5 6 7 8 9 10 11 12 13 14 15 16 17 18 19 20 21 22feat(UserProfile): add user profile editing feature This commit introduces a new feature that allows users to edit their profiles directly from the user interface. The motivation behind this change is to enhance user interaction and provide a more seamless experience. Previously, users had to navigate to a separate editing page to update their profile information. With this new feature, users can now make changes efficiently from their profile page, eliminating unnecessary steps in the workflow. Changes included in this commit: - Added a new 'Edit Profile' button on the user profile page. - Implemented frontend components for profile editing. - Updated backend API to handle profile updates securely. By streamlining the profile editing process, we aim to improve overall user satisfaction and make our application more user-friendly. This enhancement is in response to user feedback, addressing the need for a more intuitive and accessible way to modify profile details. Closes #234纠正输入验证逻辑
1 2 3 4 5 6 7 8 9 10 11 12 13 14 15 16 17 18fix(Validation): correct input validation logic This commit addresses an issue related to input validation logic in the application. Previously, the validation process was not handling certain edge cases correctly, leading to unexpected behavior in specific scenarios. To resolve this issue, the validation logic has been revised to properly handle various input scenarios. This ensures that user input is thoroughly validated, reducing the likelihood of errors in the application. The changes made in this commit include: - Correcting boundary checks for user input. - Improving error messages for better user guidance. These adjustments align with our commitment to delivering a robust and reliable application experience. Closes #123优化数据库查询
1 2 3 4 5 6 7 8 9 10 11 12 13 14 15refactor(DataAccess): optimize database queries In this commit, we have refactored the data access layer to optimize database queries and improve overall system performance. The existing query structure was identified as a bottleneck during performance testing, leading to longer response times. Changes made in this commit: - Reorganized database queries to reduce redundant operations. - Utilized database indexing for faster data retrieval. By optimizing database queries, we expect to see a significant improvement in system responsiveness and user experience. Closes #456
2 git commit 工具
2.1 commitizen
Commitizen是一个强大的工具,用于撰写合格的 Git 提交消息。使用 Commitizen 可以帮助团队遵循统一的提交消息规范,使提交历史更加清晰和易读。
首先,通过以下命令全局安装 Commitizen:
1npm install -g commitizen
然后,在项目目录里,运行下面的命令,使其支持 Angular 的 Commit message 格式。
1commitizen init cz-conventional-changelog --save --save-exact
这个命令会配置项目,使其支持 Angular 规范的 Commit Message。在执行命令时,你可以选择其他预定义的规范或者创建自定义规范。
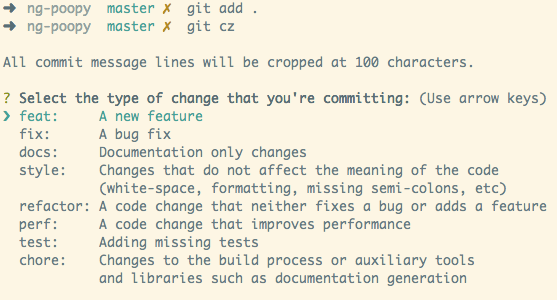
之后,当你执行 git commit 命令时,将其替换为 git cz。此时,Commitizen 将引导你通过一个交互式的界面,以生成符合规范的 Commit Message。
 在这个交互式界面中,你可以选择提交的类型(feat、fix、docs 等)、影响的范围(scope)、简短的描述(subject)以及其他相关信息。通过这种方式,可以确保提交消息符合规范,并提供了更多的上下文信息,便于他人理解变更的目的。
使用 Commitizen 和规范化的提交消息格式,有助于提高代码库的可读性,方便生成自动化的变更日志,并促使开发者更注重写出清晰、明确的提交消息。
2.2 commitlint
commitlint是一个用于检查提交消息是否符合指定规范的工具。它可以帮助团队确保 Git 提交消息的一致性和规范性,尤其是当项目采用类似 Angular Commit Message Conventions 的规范时。
安装 Commitlint
首先,你需要安装
commitlint及其相关的配置和规则。通常,@commitlint/config-conventional是与 Angular 规范兼容的配置。1npm install --save-dev @commitlint/config-conventional @commitlint/cli配置 Commitlint
在项目根目录下创建
commitlint.config.js文件,并添加如下内容:1 2 3module.exports = { extends: ['@commitlint/config-conventional'], };这个配置文件使用了
@commitlint/config-conventional中预定义的规则,确保符合常见的提交规范。配置Git钩子
你可以使用 Husky 钩子工具来在提交前运行
commitlint。首先,安装 Husky:1 2bashCopy code npm install --save-dev husky然后,在
package.json中添加以下配置:1 2 3 4 5 6jsonCopy code "husky": { "hooks": { "commit-msg": "commitlint -E HUSKY_GIT_PARAMS" } }这样配置后,每次提交前都会自动运行
commitlint检查提交消息是否符合规范。
3 生成Change log
如果你的所有 Commit 都符合 Angular 格式,那么发布新版本时, Change log 就可以用脚本自动生成(例1,例2)。

生成的文档包括以下三个部分。
- New features(新特性)
- Bug fixes(bug修复)
- Breaking changes(重大变更)
每个部分都会罗列相关的 commit ,并且有指向这些 commit 的链接。当然,生成的文档允许手动修改,所以发布前,你还可以添加其他内容。
conventional-changelog 就是生成 Change log 的工具,运行下面的命令即可。
1 2 3npm install -g conventional-changelog cd my-project conventional-changelog -p angular -i CHANGELOG.md -w
上面命令不会覆盖以前的 Change log,只会在CHANGELOG.md的头部加上自从上次发布以来的变动。
如果你想生成所有发布的 Change log,要改为运行下面的命令。
1$ conventional-changelog -p angular -i CHANGELOG.md -w -r 0
为了方便使用,可以将其写入package.json的scripts字段。
1 2 3 4 5{ "scripts": { "changelog": "conventional-changelog -p angular -i CHANGELOG.md -w -r 0" } }
以后,直接运行下面的命令即可。
1$ npm run changelog
这个自动化流程不仅简化了 Change log 的生成过程,还确保了记录项目变更的一致性和准确性。生成的文档会按照新特性、bug 修复和重大变更等分类,方便用户快速了解每个版本的变更情况。
4 参考资料
相关内容
 支付宝
支付宝 微信
微信